This is an example of how to use ASP.NET AJAX within the context of a CRM 4.0 form. Many CRM developers have been challenged with implementing complex business features within CRM. Many consist of integrating with external or public services. This post will demonstrate a simple pattern to implement ASP.NET AJAX within a CRM 4.0 form. This example demonstrates the ability to validate and gather data based on the user inputting a zip code on the Contact form.
The free public service that will be consumed is a zip service that validates and returns zip code information for USA zip codes.
Url (http://www.webservicex.net/uszip.asmx).
Here is the solution in action.
Creating the Web Service Project
First a Web Service project is created to consume the public zip service. This project will consume the zip service and expose a new service that will take a single parameter for the zip code, and return an object that is serializable to support JSON. Using JSON simplifies and reduces the amount of JavaScript needed to attain the data in the client. The purpose of wrapping the public service is not only to abstract the service from the CRM implementation, but also provide the ability to deploy the service within the CRM application domain. In order to use AJAX, the service must reside within the application domain to avoid the cross-domain security restriction.
In Visual Studio a new ASP.NET Web Service Application project is created. This project is targeting .Net Framework 3.5. In order to use this version, it will have to be installed on the CRM server.
In order to support Json, the following config section needs to be added to the web.config.
Next a Web Reference is added to the project for the public web service.
Url: http://www.webservicex.net/uszip.asmx?WSDL
Then a new class is added to the project for the object that will contain the data returned to the client. Below is the C# code. It has a constructor that takes an XmlNode type. The public service returns Xml, so this constructor is used to instantiate and populate the class from within the web service web method. It also must contain a default parameter-less constructor required by the serializer. Notice the class is decorated with attributes. These are required by the JsonSerializer in order to properly serialize the object. This post does not go into any more detail on using the JsonSerializer as there are plenty of articles on the web for more detail.
Next a new web service is added to the project.
In the new web service a new method is added called LookUpZipCode. Below is the code for the web service that wraps the public service. This is a very simple method that calls the public service method (GetInfoByZIP), then returns an instance of the ZipInfo class.
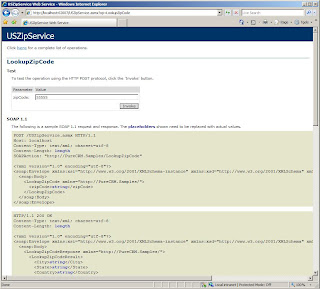
Next the service is tested.
Results:
This new service can now be consumed within the CRM application domain. One way to consume this service within a CRM form is to use Javascript and the XmlHttpRequest object. This solution is commonly used, but it's a pain. So this example demonstrates how to utilize ASP.NET AJAX and the ScriptManager control.
A new Web Form is now added to the project called ClientProxy.aspx. This page will act as the web service proxy on the client.
Next, the ScriptManager control is added to the aspx page. In the properties of this control a service reference is added to the web service that was created in the above steps. For those not familiar with the ScriptManager control can read more here (http://msdn.microsoft.com/en-us/library/bb398863.aspx). Basically, The ScriptManager control manages client script for AJAX-enabled ASP.NET Web pages. The control registers the script for the Microsoft AJAX Library with the page. This enables client script to use the type system extensions and to support Web-service calls.
Next, a Jscript file is added to the project called ClientProxyScript.js
The purpose of this script is to abstract the client web service call from the CRM form. It consists of three methods, an entry method that will be called from within the CRM form called LookupZipCode, it takes the crmForm instance as a parameter. The other two methods are callback methods the service will call when it completes or fails. Inside the complete method is where the CRM form attribute values are set. Notice the results object returned is de-serialized under the covers by MS AJAX.
Next, the script file path is added to the ScriptManager in the ClientProxy.aspx page. The ScriptManager will push the script to the client for use.
The last thing to note about the aspx page, is for this simple solution it does not require any code behind. However, if there were multiple services, functionality could be added in code behind to dynamically add the service and script references to the ScriptManager using a query string parameter as the key. This would provide a single page the client would utilize instead of a separate aspx for each service.
Deploying the Web Service Project
To deploy the web service, a new directory in the CRM website is created within the ISV directory. This example is deployed in ISV/Samples/ZipCodeLookup. The web service can now be published to this directory. Since this service requires a web.config it must run under it's own application in IIS.
Next, in IIS Manger a new application pool is created.
In IIS Manager, this new directory is converted to an IIS application by navigating, expanding and right-clicking on the ISV/Samples/ZipCodeLookup directory and selecting Convert To Application. This new application will inherit all the settings from the CRM website including Anonymous Access - Disabled, Windows Authentication - Enabled, and Impersonation - On.
In the Convert To Application dialog box, the Application Pool is changed to use the USZipCodeLookup application pool created earlier. Isolating the web service in it's own application pool protects the CRM application from any issues that may arise in the web service.
Configuring the AJAX Service in CRM
This example uses the Contact entity, but it could be configured on any out-of-the-box or custom entity that requires an address. In CRM, the Contact entity Form is edited in the Customization area, where the zip code attribute is set to read-only. The form's OnLoad event will enable the zip code when the IFrame is loaded. Next, an IFrame is added to the bottom of the form. See the properties below. The Url is set to about:blank as it will be set dynamically in the forms OnLoad event. Also, leveraging an IFrame provides the ability to load the ClientProxy.aspx page, thus giving the form visibility to all the JavaScript the ScriptManager is configured to load.
In the form properties the form's OnLoad event is updated to include the following code. This will obviously not work if the user is offline, so it first checks if the user is online. Then it checks if the form is a create or edit form. It should not be available on any other form type as the form will be read-only. Next, the code dynamically sets the src property of the IFrame using a relative path to the location of the ClientProxy.aspx page. And lastly, it wires the onreadystatechange event of the IFrame. When the IFrame load is completed, the zip code attribute is enabled. This prevents a user from entering a zip code prior to the IFrame loading. The IFrame usually loads very quickly, except for the first time the aspx is requested as the service application needs be JIT'ed.
Lastly, the zip code attribute's OnChange event is updated with the following code. This code gets a handle to the IFrame's contentWindow and calls the LookupZipCode method in the ClientProxyScript.js file.
Final Thoughts
Coming soon, a follow-up post with the same implementation that uses WCF REST instead of an ASMX Service.


